Laravel Avatar Image Upload Tutorial With Example
Laravel Profile Picture Upload Tutorial
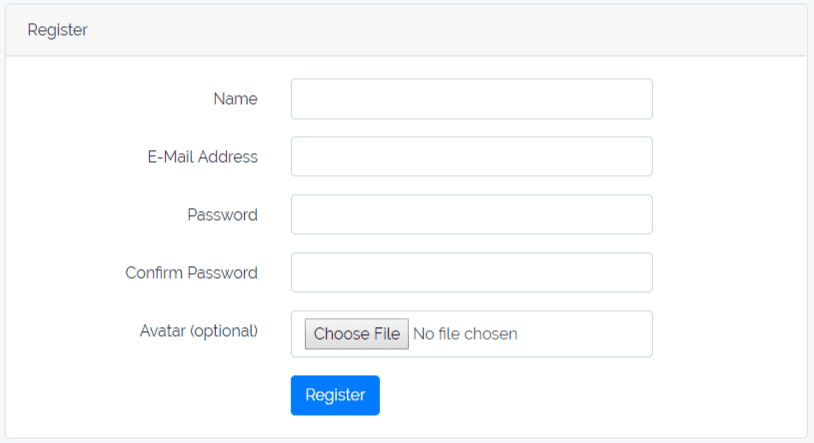
Laravel Avatar Image Upload Tutorial With Example is the topic, we will discuss today. We will use laravel 5.6 with Spatie’s Media Library Package. By default, Laravel registration form includes only the name, email, and password, but usually, it’s helpful to allow the user to upload the photo or an avatar.
Laravel Avatar Image Upload Tutorial With Example
We are going to Configure Laravel Project.
Step 1: Download Laravel Project
Establish Laravel Project by the typing following command.
composer create-project --prefer-dist laravel/laravel uploadavatarimagesStep 2: Setup SQL Database
Now we can setup database credentials.
//.env

DB_CONNECTION=mysql
DB_HOST=127.0.0.1
DB_PORT=3306
DB_DATABASE=avatarimageupload
DB_USERNAME=root
DB_PASSWORD=
Next, Laravel provides a quick way to scaffold all of the routes and views you need for authentication using one simple command:
php artisan make:auth
This command should be applied to new applications and will install a layout view, registration and login views, as well as routes to all authentication end-points.
Step 3: Modify User Registration Form
Now we can add an avatar in resources >> views >> auth >> register.blade.php file.
<!-- register.blade.php -->

<div class="form-group row">
    <label for="avatar" class="col-md-4 col-form-label text-md-right">{{ __('Avatar (optional)') }}</label>

    <div class="col-md-6">
        <input id="avatar" type="file" class="form-control" name="avatar">
    </div>
</div>
Also, you can add enctype=”multipart/form-data” in form. So final code of register.blade.php looks like that
<!-- register.blade.php -->

@extends('layouts.app')

@section('content')
<div class="container">
    <div class="row justify-content-center">
        <div class="col-md-8">
            <div class="card">
                <div class="card-header">{{ __('Register') }}</div>

                <div class="card-body">
                    <form method="POST" action="{{ route('register') }}" enctype="multipart/form-data">
                        @csrf

                        <div class="form-group row">
                            <label for="name" class="col-md-4 col-form-label text-md-right">{{ __('Name') }}</label>

                            <div class="col-md-6">
                                <input id="name" type="text" class="form-control{{ $errors->has('name') ? ' is-invalid' : '' }}" name="name" value="{{ old('name') }}" required autofocus>

                                @if ($errors->has('name'))
                                    <span class="invalid-feedback">
                                        <strong>{{ $errors->first('name') }}</strong>
                                    </span>
                                @endif
                            </div>
                        </div>

                        <div class="form-group row">
                            <label for="email" class="col-md-4 col-form-label text-md-right">{{ __('E-Mail Address') }}</label>

                            <div class="col-md-6">
                                <input id="email" type="email" class="form-control{{ $errors->has('email') ? ' is-invalid' : '' }}" name="email" value="{{ old('email') }}" required>

                                @if ($errors->has('email'))
                                    <span class="invalid-feedback">
                                        <strong>{{ $errors->first('email') }}</strong>
                                    </span>
                                @endif
                            </div>
                        </div>

                        <div class="form-group row">
                            <label for="password" class="col-md-4 col-form-label text-md-right">{{ __('Password') }}</label>

                            <div class="col-md-6">
                                <input id="password" type="password" class="form-control{{ $errors->has('password') ? ' is-invalid' : '' }}" name="password" required>

                                @if ($errors->has('password'))
                                    <span class="invalid-feedback">
                                        <strong>{{ $errors->first('password') }}</strong>
                                    </span>
                                @endif
                            </div>
                        </div>

                        <div class="form-group row">
                            <label for="password-confirm" class="col-md-4 col-form-label text-md-right">{{ __('Confirm Password') }}</label>

                            <div class="col-md-6">
                                <input id="password-confirm" type="password" class="form-control" name="password_confirmation" required>
                            </div>
                        </div>

                    <div class="form-group row">
                        <label for="avatar" class="col-md-4 col-form-label text-md-right">{{ __('Avatar (optional)') }}</label>

                        <div class="col-md-6">
                             <input type="file" class="form-control" name="avatar" id="avatar">
                        </div>
                    </div>

                        <div class="form-group row mb-0">
                            <div class="col-md-6 offset-md-4">
                                <button type="submit" class="btn btn-primary">
                                    {{ __('Register') }}
                                </button>
                            </div>
                        </div>
                    </form>
                </div>
            </div>
        </div>
    </div>
</div>
@endsection
If you don’t have add enctype then you see an error like this:
Error : Spatie \ MediaLibrary \ Exceptions \ FileCannotBeAdded \ RequestDoesNotHaveFile The current request does not have a file in a key named `avatar`
Step 4: Install Spatie’s Media Library Package
First, install Spatie’s Media Library Package via the Composer package manager.
composer require spatie/laravel-medialibrary:^7.0.0
After installing Spatie’s Media Library, you should publish the Spatie’s Media Library configuration using the vendor: publish Artisan command.
php artisan vendor:publish --provider="Spatie\MediaLibrary\MediaLibraryServiceProvider" --tag="migrations"
Finally, we have migrations in our published folder:
php artisan migrate
It will generate a database table called media which uses Polymorphic Relations to store the data. You can see an error like this:
Error : [Illuminate\Database\QueryException] SQLSTATE[42000]: Syntax error or access violation: 1064 You have an error in your SQL syntax; check the manual that correspond to your MariaDB server version of the right syntax to use ‘json not null,
tf8mb4 collate utf8mb4_unicode_ci)
custom_properties json not null, order_column int unsigned nu’ at line 1 (SQL: create table m edia(id int unsigned not null auto_increment primary key, model_id int unsigned not null, model _typevarchar(191) not null, collection_name varchar(191) not null, name varchar(191) not null, file_namevarchar(191) not null, mime_type varchar(191) null, disk varchar(191) not null, size int unsigned not null, manipulations json not null, custom_properties json not null, order_column int unsigned null, created_at timestamp null, updated_at timestamp null) default character set utf8mb4 collate utf8mb4_unicode_ci)
Possible Solution: you can change datatype json to text in database >> migration >> create_media_table.php file.
Media table looks like that
//create_media_table.php

public function up()
    {
        Schema::create('media', function (Blueprint $table) {
            $table->increments('id');
            $table->morphs('model');
            $table->string('collection_name');
            $table->string('name');
            $table->string('file_name');
            $table->string('mime_type')->nullable();
            $table->string('disk');
            $table->unsignedInteger('size');
            $table->text('manipulations');
            $table->text('custom_properties');
            $table->text('responsive_images');
            $table->unsignedInteger('order_column')->nullable();
            $table->nullableTimestamps();
        });
    }
Step 5: Change the User Model File
Now, let’s develop that app >> User.php model to work with Media Library. Add Following code in User.php file.
//User.php

use Spatie\MediaLibrary\HasMedia\HasMediaTrait;
use Spatie\MediaLibrary\HasMedia\HasMedia;

class User extends Authenticatable implements HasMedia
{
    // ...
    use HasMediaTrait;
}
Here we can add HasMediaTrait and HasMedia. Both come from Media Library.


0 comments:
Post a Comment