To install Oracle database on your computer, you need to download the installer from the download page of Oracle website.
After having the installation files which are in ZIP format, you need to extract them into a specific folder on your computer.
The following picture shows the structure of the folder of the Oracle installation files after extraction.
Now you need to double-click the setup.exe file to start the installation process. There will be 9 steps which mostly automatically execute.
Step 1. The installer asks you to provide your email address to get the latest security issues and updates. You can ignore it by clicking the Next button
Because I didn’t provide the email address, the Oracle database installer confirm it, you just need to click the No button to continue.
Step 2. In step 2, Oracle installer ask you to whether you want to create and configure a database, install database software only or just upgrade an existing database. Because you install the Oracle database at the first time, choose the option 1 and click the Next button.
Step 3. The installer allows you to choose the system class. Because you install Oracle on your computer, not a server, therefore, you choose the first option: desktop class and click the Next button.
Step 4. This step allows you to specify the Windows user account to install and configure Oracle Home for enhanced security. Choose the third option: “Use Windows Built-in Account”.
Step 5. in this step you can (1) choose the folder on which Oracle database will be installed, (2) Global database name and password, (3) pluggable database name.
Step 5. in this step you can (1) choose the folder on which Oracle database will be installed, (2) Global database name and password, (3) pluggable database name.
Step 7. The installer shows you the summary of the information such as global settings, database information, etc. You need to review the information and click the install button if everything is fine.
Step 8. The installer starts installing Oracle database. It will take a few minutes to complete, depending on your computer.
You will see the Database Configuration Assistant window. Click the Password
management… button to enter the password for Oracle database accounts.
management… button to enter the password for Oracle database accounts.
Step 9. Once installation completes successfully, the installer will inform you as shown in the following screenshot. Click the Close button to close the window.
Connecting to Oracle Database
First, launch the SQL developer application provided by the Oracle Database.
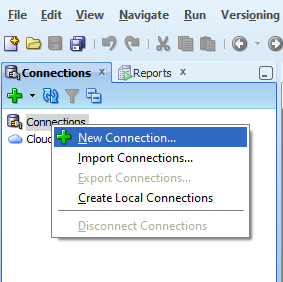
Second, right click the connections node and choose New Connection … menu item to create a new connection.
Third, enter the information that you provided during the installation process as shown in the following screenshot. Click the Connect button to connect to the Oracle Database..
Congratulation! you have installed Oracle Database 12c successfully. Let’s start exploring Oracle.


0 comments:
Post a Comment